Vintage photo tricks still work today
The simple photography technique of using a time exposure with flash goes way back to the days of flash powder and glass plates. And it’s just as effective and worth applying today as it was then.
The Victorians didn’t need fancy sophisticated flash set-ups to produce great images; they had no multi-channel wireless systems or remote shutter controls. You don’t need them either. All you need is a camera with a manual long-exposure setting, a good, firm tripod and a flash unit with a manual release button. Oh, you might add a shutter release cable – if your modern camera has the facility to accept one. Otherwise you may be stuck with one of those wretched ‘zapper’ releases.
The Independent newspaper
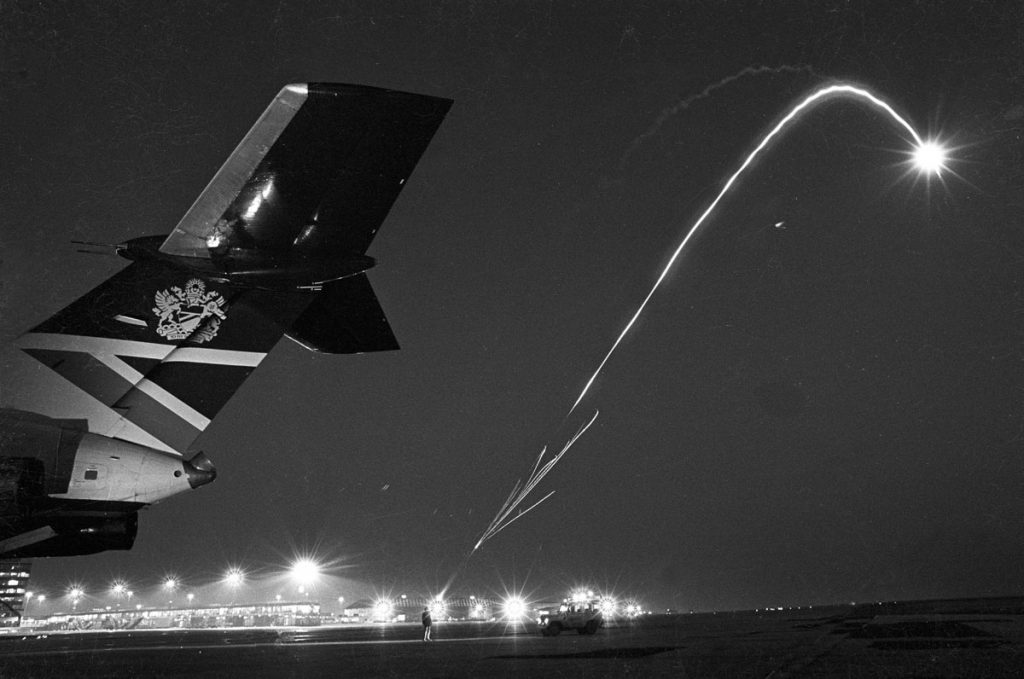
The vintage picture here is a good example of just how far this technique of time exposure with flash might be taken. It goes back to 1987 when I was working for The Independent newspaper.
I was sent to Manchester Airport where a doctor of avian biology had been employed to come up with ideas to reduce the risk of bird strikes These were not only very dangerous, but where costing hundreds of thousands of pounds in delays and damage to aircraft. His most effective method by far was to frighten the hell out of the birds with exploding maroon rockets.
Five minute to get the picture
The obvious aim was to photograph the doctor firing one of these maroons, but I would have to include an aircraft in the picture for context. Also the picture would have to be taken at dusk or at night in order to see the rocket and the final explosion. Yes, the doctor did often let these maroons off at night to disturb seagulls.
The airport control tower gave us a slot of just five minutes to get the picture. We had permission to fire just two maroons. So no pressure.
Rocket science
The biggest problem was to judge (guess) how high the maroon rocket would soar before it started to fall and explode.
Everything was set up. The doctor stood in front of his Landrover – with its headlights pointing straight at him. The camera was on its tripod under the tail of the aircraft.
Time exposure with flash – the settings
For this example of time exposure with flash, the shutter was set on ‘B’ (bulb). This meant that when I pressed the shutter release it would remain open until I let go of it. The aperture was set at f11. The film was Fuji Neopan 400 rated normally.
I pressed the shutter and gave the signal to fire the first maroon. As soon as it was in the air I fired the flash at the tail of the aircraft. The maroon soared up, started to fall and exploded with a deafening bang. I closed the shutter. I guess the shutter was open for about 6-7 seconds. Possibly a little more.
I judged that the maroon had risen too high and had gone out of the frame at its apex. So I moved the camera and tripod back several paces to give more space, and asked the doctor to aim the next shot a fraction lower.
Shooting blind
Fire! Another arc of the flare and another massive boom reverberated around the airport. This time a got the feeling that I had got it right. Only a feeling because I could not look though the viewfinder on a SLR camera when the shutter was pressed and the mirror was up. Besides. as soon as the shutter was pressed, I had to aim and fire the flash to light up the aircraft tail. In effect, I was shooting blind.
When the film was processed later that night, I saw that I had been right. In the first shot, the flare went right out of the top of the frame. The second frame is the one you see here. It is printed full frame.
Essentially, when using time exposure with flash, the shutter is opened, the camera will gather the available light until it is closed. If you fire a flash at part of the subject while the shutter is still open, that part will be illuminated by the flash for a fraction of a second. The camera will continue to gather the available light until it is closed.
What you can’t see
The one element of this photograph that cannot be seen is the biting and icy wind that was whipping across the airport. My fingers were quite numb by the time we had finished.
FIND OUT ABOUT PHILIP DUNN’S ONE-TO-ONE PHOTOGRAPHY TUITION
Hi Philip,
I had a bash at this technique just last week in Venice. I did a long exposure of San Georgio Maggiore (20 secs) and towards the end fired my flashgun at the gondolas moored in front of me. It worked slightly – next time I go to Venice I’ll have a few more tries!
All the best
Irene
Hello Irene – why not email me the picture – or even better, post it up here and I can talk about it. It might help next time.