THE DIRECTION OF LIGHT
Good light is the photographer’s most vital yet least understood ingredient. It’s more important than a whole bagful of expensive gear. Let’s get to grips with the direction of light.
Let’s face it, you can’t take photographs without it so the more you get to grips with it the better. An understanding of light will transform the way you see and enable you to express yourself visually. It will help you highlight the vibrancy of colours, create visual mood, pick out the textures of everything from stone walls to wrinkly faces, and capture the outline shapes of almost any subject you choose.
Oddly, you don’t need a camera in your hands to practice ‘seeing the light’. Start by observing the way the light falls on everything around you; people’s faces, buildings, trees, water. You can do this any time, anywhere, no matter what you are doing; walking to work, sitting by a window, out shopping. This is part of a process that will enable you to be objective about your photography and to start seeing the way the camera sees.
Observing the directions of light in particular becomes a habit and you won’t be able to stop doing it – I tell my students it’s like the Chinese curse of having a monkey on your back – you can never get rid of the habit once you’ve got it. However, our Light Monkey is a helpful soul and he is always there to help… although he may give you a sharp prod if you stop listening to him.
The photographer is an illusionist
Think of yourself as an illusionist – and one of the most powerful illusions you can create within your two-dimensional photograph is the illusion of depth – the third dimension. Composition is one way to achieve this, the other is intelligent use of light.
I divide light into three, its direction, its quality and its colour. I want you to be able to recognise these particular attributes of any light source instantly. This will enable you get exactly what you want from every subject.
Let’s take a look at the direction of light first of all, but bear in mind that in the real world the direction of light might be a combination of some of these headings…. ‘toppy-back’ light, for instance – there’s a new word for you. And sometimes the light may be totally non-directional.
You won’t always be able to change the light – but often you will be able to adjust your shooting angle or the position of your subject in order to make the most of what you have. For instance, you may be able to time your visit to a certain location to coincide with the direction of light that will show it off best. Sadly, this is not always possible especially for professional photographers under pressure of time and deadlines. They will have to resort to all sorts of tricks – but I’ll tell you more about those in future articles.
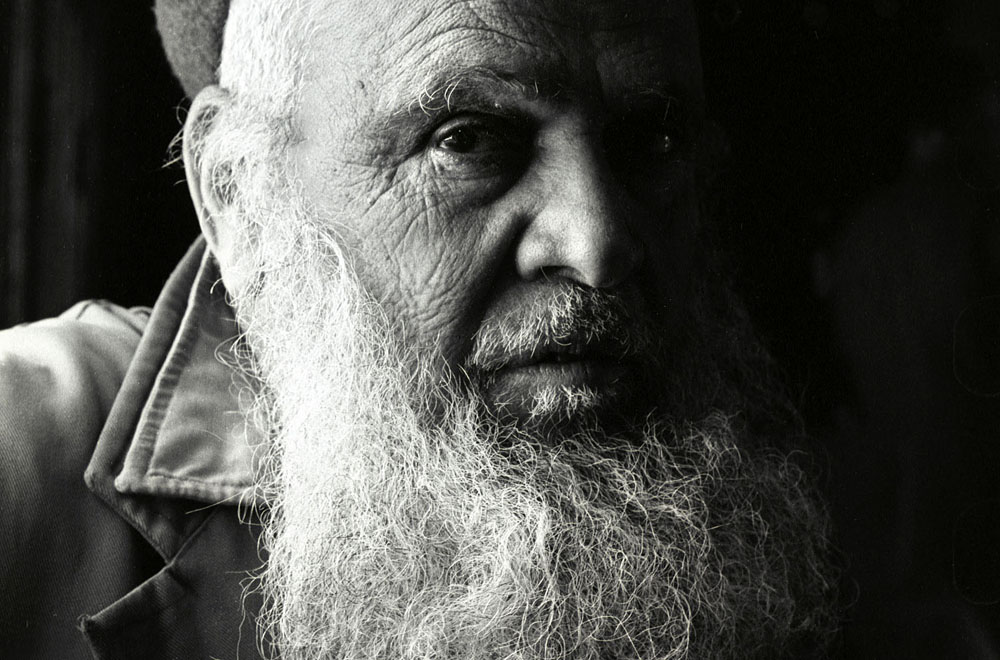
SIDE LIGHT

Side light is perhaps the star of the show. With the light to one side of your subject (almost any subject), you will create the illusion of depth, texture, shape, form, substance, call it what you will, on your two-dimensional photograph. This can be powerful stuff. Side light can transform everything from portraits or landscape into strongly textured images with the illusion of that third dimension. Beware, though, it shows every imperfection of a model’s complexion, some subjects hate it as it shows the texture of their skin (wrinkles), so it’s not the way to disguise those ‘laughter lines’. It can make buildings appear as cubes, tree trunks look round, give contours to hills – and all because you have light on one side of your subject and shadow on the other.
FRONT LIGHT
FRONT LIGHT... put the light source directly behind the camera – front-on to your subject – and you take away the shadows. This tends to ‘flatten’ the image; it loses any 3D effect. However, front light has a great trick up its sleeve… shadows often obscure colours. So if your subject is colourful and you want to see more colour – use front light. The downside is that you lose texture and form in your subject.
BACK LIGHT
Learn more about light and how to use it on a one-to-one photography course with Philip Dunn
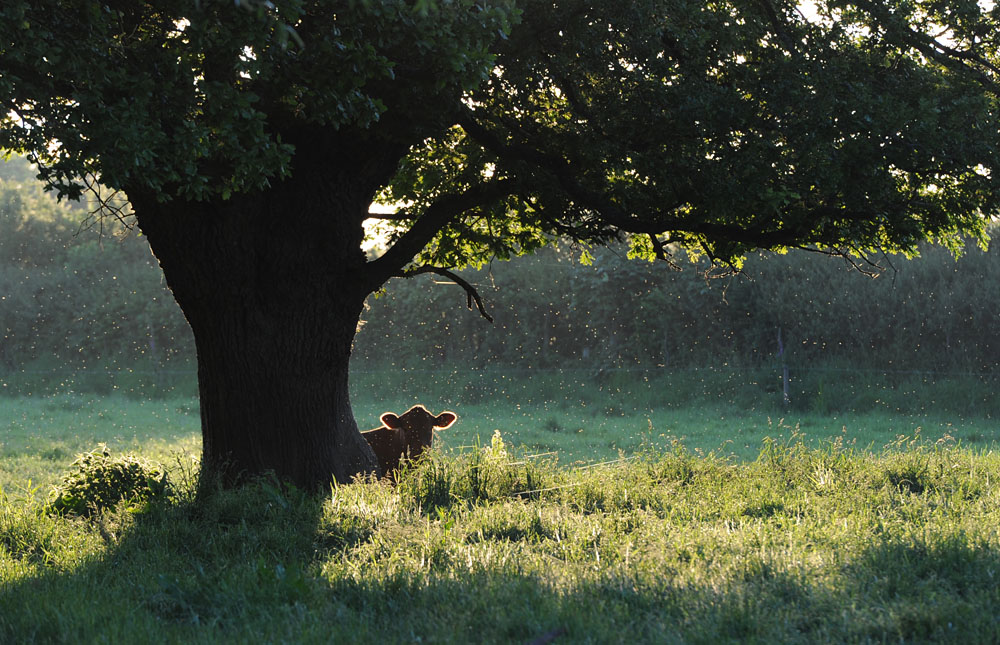
BACK LIGHT… Shoot into the light and put the light source behind your subject and, in the most extreme case, you will create a silhouette – emphasizing outline shape. Back light does not have to be quite so obvious, though, and with a little diffusion from such things as clouds or reflectors, it can create a soft, subtle ‘atmosphere’, but more about that when we talk about the ‘quality of light’ in a future article. Back light often creates a rim, or halo effect around the subject – this is much-used in studio portraiture to separate the outline of the model from the background. It happens in nature, too – look at the picture of the cow and notice how the hairs on its head and ears stand out against the dark background. So if you intend to emphasize the outline shape of your subject, use back light.
TOP LIGHT

This is the one to avoid whenever possible. Professional travel and landscape photographers work both ends of the day – morning and evening. That’s because the light source, the sun, is low in the sky and can be used as front, side or back light. With the light directly above, portraits look horrible. Landscapes and buildings look boring and no matter in which direction you look at it, the light remains the same.
Avoid it. Come back later or ask your subject to step into a doorway where you can use sidelight – anything to avoid top light.
The full version of this article, written and photographed by Philip Dunn, first appeared in Amateur Photographer Magazine